Category

Recipes

Category

Did you know, it is estimated that Americans watching the Super Bowl typically eat 2,400 calories during game time?

As Sabra Canada is the official dip of the NFL, what better way to enjoy the game with something different. A healthy alternative is to create a fun interactive Mediterranean Nacho Bar for those who want healthier game day snack. With more dietary restrictions among my friends and family, this is great to have for everyone to nibble on.

There are many ways to craft this Mediterranean Nacho Bar for your guests with your favourite veggies and dips.

Hummus is gluten-free and it made of chickpeas blended with tahini, olive oil, lemon juice, salt and garlic. One of my addictions that I add into my meals.

Some common Mediterranean flavours are – basil, cucumbers, dill, fennel, feta cheese, garlic, honey, lemon, mint, olive oil, oregano, and yogurt to recreate that coast flavour profile. Or you can always mix and match ingredients you enjoy.

[tabs tab1=”Mediterranean Nacho Bar ” ]

[tab id=1]

Ingredients:

  • Pita Chips
  • Hummus
  • Asparagus
  • Broccoli
  • Cherry tomatoes
  • Chopped zucchini
  • Olives
  • Crumbled Feta
  • Pepperoncinis
  • Grilled Chicken

Directions

  1. Assemble items on a platter and serve.
  2. Refill when needed.

Preparing the grilled chicken:

  • Cut chicken into strips.
  • Season with Italian seasoning and olive oil.
  • Grill at around 400F for 4.5 minutes each side. You want to get the grill hot so the chicken doesn’t stick to it.

[/tab]

[/tabs]

If you’re looking for other fun quick easy recipes with Hummus, check out sabradips.ca for more inspiration.

Sliced Smoked Salmon

There are many types of smoked salmon products, but you are probably most familiar with the sliced smoked salmon that comes frozen. It’s very versatile in just about anything. With it’s smokey flavour and soft texture, cream cheese is it’s best friend.

Nanuk is Oceanfood Sales’ house brand with Nanuk smoked salmon being one of their top-leading products. Oceanfood Sales sent me a few different items to play around with, so below is everything I made with it. You can find them at Thrifty’s, T&T, Sobey’s Safeway, Buy Low, Quality Foods, and Whole Foods Market.

Bagel

This simple 3 ingredient bagel is great with an everything bagel, whipped cream cheese, and lots of smoked salmon slices. Pile it on high and don’t be shy.

Toast

Similar to a bagel is toast, but you have some creativity to jazz it up and have different types of toast to pair along with it. I had cream cheese, salmon, capers, and chives on one side and then smashed avocado and red pepper flakes on the other. A good balance of clean flavours.

Balik

Balik is usually sliced into thick blocks and topped with creme fresh and dill as well as sturgeon caviar.

I decided to slice the balik into smaller pieces and to keep its integrity as it’s a pretty good piece of smoked salmon. I added hummus on the bottom of the plate, but some radishes, avocado, and topped the salmon with sour cream and caviar.

Maple Smoked Salmon Nuggets

These bite-sized pieces of sockeye salmon are infused with maple syrup.

You can eat it as is when they defrost, or you can heat them up and serve. A good 2 bites per piece and goo smokey depth of flavour with a hint of sweetness.

I didn’t know what to go with some extras, so I chopped it up and threw them on toast with some dill and more cream cheese, Can’t go wrong with that.

Hot Smoked Rainbow Trout

Rainbow trout isn’t salmon but it can be smoked. I took the hot smoked rainbow trout, which is 100% boneless and goes great with salads. I broke up the pieces and put it all over the salad.

Hopefully this has given you some inspiration to cook up of great meal with smoked salmon or any types of smoked fish.

The fad of making zoodles / zucchinni noodles is all over the internet as a grain-free and healthy alternative to making “pasta”. I got this hand-powered machine – Cuisinart Food Spiralizer to make dinners more exciting and easy to prep my ingredients. With this machine, there is a Safe Blade Lock Design and Sealed storage compartment which makes it easy for kids to get involved in meal prep without getting close to the blade.

There are 3 cutting options:

  • Thin Julienne
  • Thick Julienne
  • Ribbon Slice

Thin or Thick Julienne are best for making veggie noodles, so that what we are going to make today. You can eat them raw, microwaved, sauteed, boiled or baked.

I just my zucchini into 4 sections and removed either ends. There are nobs on either side of the device to adjust the blades so you know what you’re cutting them into.

You swing the handle in a circular motion and it begins slicing up the zucchini effortlessly. If you accidentally cut the zucchini segments in an angular way, the spiralizer will have a hard time gripping onto it, thus some slippage.

Thick Julienne

I refer the thicker julienne zoodles as it holds better when cooking. The longer you cook them, the mushier they get.

Thin Julienne

Depending on what you’re making, you may feel one style is better than the other.

Seared Tuna with Pesto Zoodles

[tabs tab1=”Seared Tuna with Pesto Zoodles”]

[tab id=1]

Serves: 2

Ingredients:

  • 1 Zucchini
  • 80g Pesto
  • 2 Tuna Steaks (170g each)
  • Salt
  • Pepper

Directions:

  1. Cut the end of the zucchini and cut them into 4 sections.
  2. Use the spiralizer to create your zoodles.
  3. Season tuna steaks with salt and pepper to taste.
  4. In a medium heat pan, sear each side of the tuna steak for 1.5 minutes and let rest.
  5. In another pan, cook zoodles with pesto for 2 minutes.
  6. Plate the your dish with the zoodles and them top it with your slices seared tuna.
  7. Enjoy

[/tab]

[/tabs]


Thai Iced Tea is an absolute treat and my friend finally encouraged me to make this at home instead of spending all my money drinking these at restaurants. There’s many variations of making Thai Iced Tea, but I don’t like buying so many ingredients that might go wasted if I don’t use them all. It’s always a hit when I have friends over and it’s pretty easy to make and you can’t go wrong with it.

This article contains Amazon affiliate links. All you need for this recipe is the Thai tea mix, granulated sugar, and cream. So simple! You can now have it at home all the time.

Thai Tea Mix can be hard to find in stores, so I opted to go get it from Amazon as well as a fine mesh strainer. The mesh strainer is important as it will remove as much tea leaves as possible to give you a clear tea. Sometimes some sediments will form even with a fine strainer, but it won’t affect your enjoyment of the drink. I preferred this option of buying online rather from hunting store by store in hopes they carry this tea mix. Plus, the 400g bag of tea mix lasts quite a while.

[tabs tab1=”3 Ingredient Thai Iced Milk Tea”]

[tab id=1]

Ingredients:

  • 1 cup Thai Tea Mix
  • 8 cups Water
  • 1/2 cup Granulated Sugar ( or to your liking)
  • Cream
  • Ice

Instructions:

  1. In a small pot, bring water to a boil. Add the Thai tea mix in a mesh bag strainer and let it boil for 15 minutes.
  2. Add in sugar and stir to dissolve. Taste to ensure it’s your desired level of sweetness.
  3. Turn off the heat and let the tea steep for 30 minutes as it cools. (The stronger the tea, the better the tea will taste.)
  4. Take the mesh bag with the tea leaves out of the pot.
  5. You can make the Thai Iced Tea ahead of time and have the tea chilling in the fridge OR if you can’t control yourself, drink it right away if it’s cool enough.
  6. Fill the glass with ice and pour in the tea leaving a little room for the cream. About 3 tablespoons for a glass.
  7. Stir and enjoy.

[/tab]

[/tabs]


I love a good brunch on the weekends, but sometimes it’s good to enjoy it at the comfort of your own home. With the Winter weather arriving, sometimes you just want to be cozy in your PJs and slippers.

In partnership with Egg Farmers of Canada – a committed partner of Food Banks of Canada, Chef Lynn Crawford, chef/owner of Ruby Watchco created “Recipes that Give” aimed to inspire others, donate to their local food banks, and ensure Canadians have access to nutritious and wholesome meals, including fresh, local, high-quality eggs.

Did you know Egg Farmers of Canada donates over 1 million eggs annually to the Food Banks of Canada? If you want to donate to the Greater Vancouver Food Bank (GVFB), donating money is the best way to make the money stretch. GVFB is able to purchase around $3 of food for every $1 donated, meaning monetary donations can go the furthest.

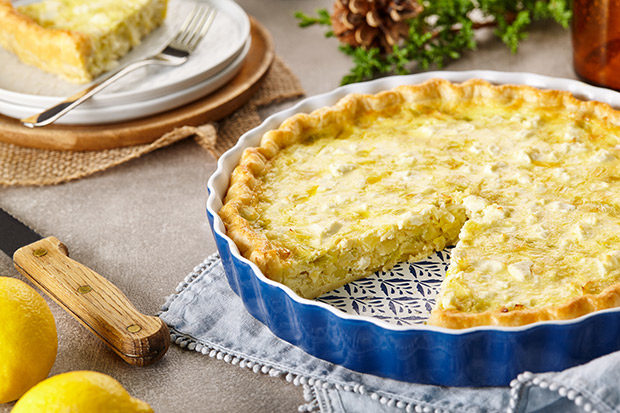
Leek, Lemon and Feta Quiche

[tabs tab1=”Instructions”]

[tab id=1]

Makes 1 large quiche (6 servings)

  • 1 sheet frozen puff pastry
  • 2 tbsp (30 mL) extra-virgin olive oil
  • 2 cups (500 mL) cleaned and diced leeks
  • 1 cup (250 mL) heavy cream
  • 4 eggs
  • 1 tsp (5 mL) grated lemon zest
  • 1 tsp (5 mL) kosher salt
  • ¼ tsp freshly ground black pepper
  • 3 ounces (90 g) feta cheese, crumbled

Thaw puff pastry according to package directions.

Preheat oven to 375⁰F (190⁰C).

Heat olive oil in a large skillet over medium heat. Add leeks and cook until they are wilted, about 5-7 minutes, then reserve.

In a mixing bowl, whisk together cream, eggs, lemon zest, salt and pepper.

On a lightly floured surface, or between two layers of plastic wrap or parchment paper, roll out the thawed puff pastry to a thickness of about 1/4 inch (5 mm). Line a shallow 9” (23 cm) pie plate and press the pastry up the sides to make a nice edge.

Distribute leeks evenly across the bottom of the dish. Pour the cream mixture over leeks. Top the quiche with feta.

Bake 30 – 40 minutes until the center is firm and the crust and top are nicely browned.

[/tab]

[/tabs]

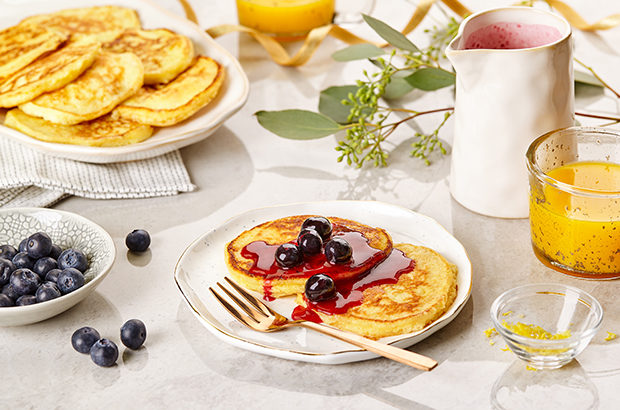
Lemon Ricotta Pancakes with Blueberry Sauce

[tabs tab1=”Instructions” ]

[tab id=1]

Talk about fluffy pancakes! Chef Lynn Crawford shares one of her favourite recipe that can easily be made for brunch or breakfast. Try it – it will please everyone around the table.

Serves: 4

INGREDIENTS:

  • 6 eggs
  • 1½ cups (375 ml) ricotta cheese
  • ½ cup (125 ml) melted butter, cooled
  • ½ cup (125 ml) all-purpose flour
  • ¼ cup (60 ml) sugar
  • ½ tsp (2 ml) salt
  • 2 tbsp (30 ml) grated lemon zest
  • Butter, for griddle or pan

Lemon Ricotta Pancakes:

Separate the egg whites from the yolks.

In a large bowl, combine egg yolks, ricotta cheese and melted butter.

In a separate bowl, combine flour, sugar, salt and lemon zest. Slowly add to ricotta mixture.

In another bowl, whip the egg whites until they form firm peaks. Fold the egg whites gently into the batter, until just combined.

Over medium heat, lightly butter a griddle or non-stick pan. Ladle in about ¼ cup (60 ml) of batter to form small hot cakes and cook until golden brown on both sides.

Blueberry Sauce

  • 3 cups blueberries (750 mL) (fresh or frozen), divided in half
  • 1 cup (250 ml) water
  • 1/2 cup (125 ml) cup sugar
  • 1/2 tsp (2 ml) vanilla
  • 1 1/2 tbsp (22 ml) cornstarch dissolved into 3 tbsp (45 mL) water

Place 1 1/2 cups (375 mL) blueberries in a small saucepan. Add water, sugar and vanilla. Heat over medium-high heat, stirring occasionally, until mixture comes to a low boil, sugar is dissolved, and blueberries just start to break apart.

Add dissolved cornstarch to saucepan and bring mixture to a rolling boil. Turn heat down and simmer on low heat for 2-3 minutes. If the sauce gets too thick, add a little bit of water, one tablespoon (15 mL) at a time.

Remove from heat. Add remaining blueberries and stir gently. Serve warm or cold.

[/tab]

[/tabs]

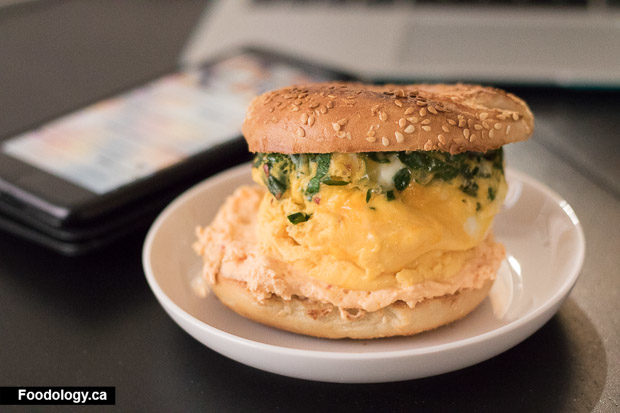
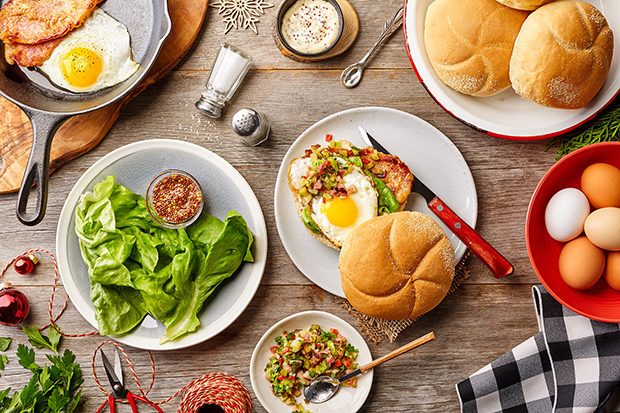
Peameal Bacon & Egg on a Bun with Spring Onion Relish and Honey Mustard Aioli

[tabs tab1=”Instructions” ]

[tab id=1]

Chef Lynn Crawford knows how to make a sandwich delicious and interesting. The aioli works so well with a runny yolk that you will want more. Share it over brunch, lunch or dinner!

Serves 4

Honey Mustard Aioli

Makes 1 cup (250 mL)

  • 1 clove garlic, minced
  • ¼ teaspoon (1 mL) salt
  • 1 cup (250 mL) mayonnaise
  • 2 tbsp (30 mL) whole-grain mustard
  • 1 tbsp (15 mL) lemon juice
  • 1 tbsp (15 mL) honey

Make the Honey Mustard Aioli

In a small bowl, stir together garlic, salt, mayonnaise, mustard, lemon juice and honey. Cover and refrigerate. Will keep for up to 1 week.

Spring Onion Pickle Relish

Makes 1 cup (250 mL)

  • 6 slices maple bacon, diced
  • ½ cup (125 mL) finely diced celery
  • ¼ cup (60 mL) finely diced spring onions or green onions
  • 1 small red chili, seeded and chopped
  • ¼ cup (60 mL) finely diced dill pickle
  • 2 tbsp (30 mL) white wine vinegar
  • Kosher salt and cracked black pepper, to taste
  • 2 tbsp (30 mL) chopped celery leaves
  • 2 tbsp (30 mL) chopped flat-leaf parsley

Make the Spring Onion Pickle Relish

In a sauté pan over medium heat, cook maple bacon until crisp. Add celery, spring onions and chili; toss together. Add pickles and vinegar; season with salt and pepper. Remove from heat and stir in celery leaves and parsley. Set aside.

Peameal Sandwiches

  • ¼ cup (60 mL) honey
  • ¼ cup (60 mL) Dijon mustard
  • 1 pound (450 g) peameal bacon, thickly sliced into 16 slices
  • 4 large eggs
  • 4 kaiser rolls
  • 4 butter lettuce leaves

Prepare the Sandwiches

In a small bowl, whisk together honey and mustard. Heat a large skillet over medium-high heat. Add 4 slices of bacon and bush tops with honey mustard to coat well. Turn and brush with more glaze. Cook bacon until golden brown and cooked through, 1 to 2 minutes per side. Remove bacon to a plate and repeat with remaining bacon.

Crack eggs into another pan, breaking yolks if desired. Cook until whites are almost set, then cover the pan with a lid and cook 30 seconds more.

Cut rolls in half. Spread 1 tablespoon (15 mL) honey mustard aioli on the bottom half of each roll. Layer each sandwich with at lettuce leaf, 4 slices of peameal bacon and an egg. Finish each sandwich with a large spoonful of spring onion pickle relish.

[/tab]

[/tabs]


We all love hitting the snooze button before waking up and getting ready to work. For some, eating breakfast isn’t part of their morning routine before heading out the door. Egg Farmers of Canada wants to inspire Canadians to eat eggs for breakfast during the week. Eating eggs during the week can be as simple as scrambling or frying up some eggs.

Here are my 2 go-to recipes for weekday eggs that require little prep and clean up.

One Pan Frittata

One pan to rule them all, so you don’t have to clean anything else.

[tabs tab1=”One Pan Frittata Recipe”]

[tab id=1]

Ingredients:

  • 2 eggs
  • Slash of 2% milk
  • 1/2 cup of spinach, chopped
  • Salt and pepper to taste
  • 4 Cherry Tomatoes
  • Goat Cheese
  • 1 tsp Olive Oil
  • Red Pepper Flakes (Optional)

Directions:

  1. In bowl, mix together eggs, milk, spinach, and salt and pepper.
  2. Add olive oil in a small pan on medium heat.
  3. Pour egg mixture in the small pan and then add cherry tomatoes on top.
  4. Cover with lid until egg looks cooked.
  5. Transfer to plate and add goat cheese and red pepper flakes.

[/tab]

[/tabs]

Eggs Florentine Bagel

This was inspired by this little mom and pop cafe that I would always go to in high school. They taught me that it’s ok to microwave eggs.

[tabs tab1=”Eggs Florentine Bagel Recipe”]

[tab id=1]

Ingredients:

  • 1 Sesame Bagel
  • 2 eggs
  • Slash of 2% milk
  • 1/2 cup of spinach, chopped
  • Salt and pepper to taste
  • Cream Cheese

Directions:

  1. In a ceramic dish, mix eggs, milk, spinach, salt and pepper.
  2. Microwave egg mixture 60 seconds on high
  3. Toast sesame bagel and then spread cream cheese on bottom layer, then add the egg.

[/tab]

[/tabs]

If you’re looking for more inspiration head over to eggs.ca to get more recipes to make kick start your weekday.

This blog post was sponsored by Egg Farmers of Canada but the opinions are all my own.

I love Frank’s Red Hot Sauce as it always reminds me of spicy buffalo wings. When I was cooking dinner one evening, I combined a few items that I already had in the fridge and pantry to create this dish. It’s a quick pasta dish to make under 30 minutes.

[tabs tab1=”Recipe” ]

[tab id=1]

Serves: 4

Ingredients:

  • 12 oz Rotini Pasta
  • 1 cup Plain Greek Yogurt
  • 1/2 cup Frank’s Red Hot Sauce
  • 1/4 chicken broth
  • 1/2 cup Shredded Chicken
  • 1/2 cup Blue Cheese Dressing

Direction:

  1. Heat a pot over medium heat
  2. Add plain greek yogurt, Franks Red hot sauce, chicken broth and blue cheese dressing. Mix until well combined.
  3. Add in shredded chicken.
  4. Allow the sauce to simmer for 5 minutes over low heat.
  5. In the meantime, boil a large pot of water and cook the pasta according to package directions, drain, add to the  sauce and stir to combine.

[/tab]

[/tabs]

I love simple meals since I usually am strapped for time after work. Litehouse had a super simple recipe for salmon using their Dilly of a Dip. I always saw it as just a dip for veggies, but I was surprised you can do so much more with it. I served it over a pasta salad, but you can have it with anything else.

[tabs tab1=”Recipe”]

[tab id=1]

Makes enough for 2.

Ingredients:

  • 2 pieces of salmon filet
  • 2 table spoons of Litehouse Dilly of A Dip
  • Salt and Pepper
  • Lemon

Directions:

  1. Preheat oven to 350 degrees.
  2. Slather Dilly of a Dip of each piece of salmon filet
  3. Season with salt and pepper
  4. Bake in oven for 15 minutes
  5. Squeeze fresh lemon on top
  6. Eat and enjoy

[/tab]

[/tabs]


One of my favourite go-to meals to make is my Tuna Avocado Poké Bowls for a quick dinner. The hardest part is finding good sashimi-grade ahi tuna as it’s not always readily available. Talk to your local store to get advice on finding the right product for poké bowls. I try to find Oceanwise Certified ahi tuna as it’s more sustainable, plus I know it’s better for us too.

[tabs tab1=”Recipe”]

[tab id=1]

Makes enough for 2 bowls.

Ingredients:

  • 170g Sashimi Grade Ahi Tuna, Cubed
  • 1 Avocado, Cubed
  • 3 tablespoons Low Sodium Soy Sauce
  • 2 tablespoons Sesame Oil
  • 2 sprigs of green onions, sliced
  • Pinch Sesame Seeds
  • 1 teaspoon Fine Red Pepper Powder
  • 2 Cups of Rice

Directions:

  1. Mix soy sauce, sesame oil, and red pepper powder to made marinade.
  2. Add ahi tuna and avocado to marinade and mix together.
  3. Refrigerate mixture for 30 minutes.
  4. Serve on top of rice
  5. Top with sesame seeds and green onions for garnish.
  6. Eat and enjoy.

[/tab]
[/tabs]

Egg Farmers of Canada invited me to an evening celebrating local eating. While food trends may come and go, eggs are always in style and in season. And, to celebrate the bounty of Canadian produce, Egg Farmers of Canada’s Chef Ambassadors have come together to create a sophisticated menu pairing eggs with regional ingredients from across the country. Chef Trevor Bird put together an Soy Stained Devilled Eggs and Dungeness Crab and it was amazing. Best devilled egg I’ve ever had. The success of this recipe also depends on what kind of eggs you use, I personally love Born 3 Eggs or Country Golden Yolk Free Range Eggs.

Soy Stained Devilled Eggs and Dungeness Crab

Prep Time: 20 minutes
Serves 8

Soy Stained Eggs:

  • 4 eggs
  • 1 cup (250 mL) soy sauce
  • 1 cup (250 mL) rice wine vinegar
  • 2 tbsp (30 mL) Sriracha sauce
  1. Boil water; place eggs in water and cook for 12 minutes. Remove and chill in ice bath.
  2. Peel eggs. Place eggs in soy sauce, rice wine vinegar, and Sriracha sauce and let sit in refrigerator for 2 days. Remove and cut in half.

Dungeness Crab Filling:

  • 4 egg yolks (removed from soy stained eggs)
  • 4 green onions, grilled and sliced plus extra for garnish
  • 1 tsp (5 mL) sesame oil
  • 1 tsp (5 mL) rice wine vinegar
  • 4 tsp (20 mL) mayonnaise
  • 1 squeeze lime juice
  • 4 tsp (20mL) crab, picked
  • 1 pinch salt
  1. Mix all ingredients together and fill in the stained egg halves.
  2. Top with a slice of grilled green onion.

Today is Earth Day (April 22) and one important thing we can’t forget is that our planet should be celebrated, honoured and protected every day. Two-thirds of our planet is covered by oceans and are home to some of the most incredible creatures on Earth.

They also play a critical role in regulating our climate and feeding the world. Taking care of our oceans can be as simple as thinking more critically about where our seafood comes from and how to buy it more responsibly. As consumers, we make a choice by having our purchasing dollars make a stance in what we believe in. 

Ocean Brands makes that choice easier for Canadians with their Gold Seal sockeye salmon and Oceans Pole & Line tuna.  These products proudly carry the Marine Stewardship Council (MSC) label, demonstrating they are from a sustainably managed fishery. 

MSC is an international non-profit that works with scientists, fisheries, seafood producers and brands around the world to advance sustainable fishing and to safeguard the health of our oceans. This council was created to address and reverse the problem of unsustainable fishing.

The blue MSC label on products guarantees they meet the most credible standard in the world. Seafood with the label can be found at retailers and restaurants across Canada from Loblaws to even McDonalds for their Fish-o-Filet.

Tuna Salad Appetizers

One of the easiest things to make at home is a tuna salad appetizer for guests. Simple 2 bites for any occasion.

  • 1 can Flaked Light Tuna
  • 13 crackers
  • 3 tablespoon Mayo
  • 1 tablespoon Mustard
  • 1 teaspoons Cayanne pepper
  • Pinch of Salt and Pepper
  • Pinch of Italian seasoning on top (optional)

You can always incorporate other ingredients into it like onions and celery for added crunch. It’s a very flexible item to create. You can even turn it into a sandwich if you wanted to for lunch.

Gold Seal Sockeye Salmon

Pole & Line Flaked Light Tuna in Water

Pole & Line Chunk Light Tuna in Water

If you’re looking for fresh seafood, you can spot this logo or the Ocean Wise logo, a Vancouver Aquarium conservation program created to educate and empower consumers about the issues surrounding sustainable seafood. They also work directly with local restaurants, markets, food services and suppliers to ensure that they have the most current scientific information and help them make ocean-friendly buying decisions.

Cherry Blossoms (Sakura) are blooming all over the world and they are just so beautiful. They don’t last very long, but they are Spring’s snow. Some love it and some hate them. Just don’t park your car under a cherry blossom tree or else you’ll be having a bad time. When the cherry blossoms bloom, it’s really pretty and photographers flock from all over to capture it’s natural beauty. In the early 1930s the mayors of both Kobe and Yokohama presented Vancouver’s Park Board with 500 Japanese cherry trees for planting at the Japanese cenotaph in Stanley Park honouring Japanese Canadians who served in WWI. Currently, the City of Vancouver has over 130,000 cherry blossom trees and continues to grow.

I wanted to take the beautiful inspiration of Cherry Blossoms and create some easy healthy breakfast items using Almond Breeze. Almond Breeze is an almond beverage used as a substitute for milk and soy. I really like the sweetened original flavour.

Berry Banana Smoothie

An easy item to make is a berry banana smoothie. To get the natural pink colour, I used berries. I find that Strawberries, Raspberries and Pomegranates work best. Cherries are good too but it ends up giving it a darker colour. Take all the ingredients and throw it into a blender. Very easy and you can’t screw up.

  • Half Banana
  • Handful of berries (strawberries and raspberries)
  • 2 cups of Almond Breeze

Red Berries Chia Pudding

For a quick breakfast on the go, chia pudding is very simple and easy to make. You can prepare it the day before or in the morning if you have time. I like to keep my ingredients simple, so here is a 3-ingredient chia pudding.

  • 2 table spoon of chia seeds
  • 3/4 cup of Almond Breeze
  • handful of berries (cherries, pomegranates, raspberry and strawberry)

Blend the berries and Almond Breeze in a hand blender. In a mason jar, mix the chia seeds and berry almond mixture. Easy and can be done in 5 minutes or less. You can change up the berries in your chia pudding too. I used frozen berries as it was on sale in the store and it keeps for much longer than fresh fruit.

Decoding nutrition labels can be confusing. With the start of a new year, eating healthier is on the top of everyone’s mind. But sometimes healthy food choices might not always be obvious, or easy.

At Loblaws owned stores like Real Canadian Superstore, Your Independent Grocer, and No Frills, all labels have guiding stars to help take the guesswork out of choosing foods that are nutritious for you and your family. For myself, picking fruits, vegetables, dairy and different proteins are easy to figure out what is best for you, but when it comes to packaged products, it’s very hard to tell, at least for me, it’s a mystery. Having those stars there help me choose the best product to purchase.

Healthy Chicken Enchiladas

I wanted to make some Chicken Enchiladas, so with a little help from Guiding Stars and Loblaws, they helped me supplement healthier ingredients into this meals by “trading up” the ingredients in the recipe.

[tabs tab1=”Healthy Chicken Enchiladas ” ]

[tab id=1]

Ingredients:

  • Around 1 lb chicken breast (traded up from dark meat)
  • 1 medium onion, chopped
  • 1 tablespoon olive oil (traded up from vegetable oil)
  • 6 (8 inch) whole grain tortillas, softened (traded up from white tortillas)
  • 1 1⁄2cups grated Monterey Jack cheese
  • 1⁄4cup unsalted butter (traded up from salted butter)
  • 1⁄4cup wheat flour (traded up from all-purpose flour)
  • 15 ounce, low-sodium chicken broth (traded up from regular chicken broth)
  • 1 Greek yogurt (traded up from sour cream)
  • Chopped red chillies to taste

Directions:

  1. In frypan, cook chicken and onion together in oil over medium-high heat until chicken is just done.
  2. Divide cooked chicken evenly between 6 tortillas; add 1 1/2 tablespoons cheese to each tortilla.
  3. Roll enchiladas and place seam-side down in 9×13″ baking dish that has been lightly sprayed with no-stick cooking spray or olive oil
  4. Melt butter in a medium saucepan; stir in flour to make a roux; stir and cook until bubbly; gradually whisk in chicken broth then bring to boiling, stirring frequently.
  5. Remove from heat; stir in YOGURT and chilies; pour sauce evenly over enchiladas.
  6. Top with remaining 3/4 cup cheese (baking dish may be double-wrapped and frozen at this point) and bake at 400F for 20 minutes until cheese is melted and sauce near edges of baking dish is bubbly.

[/tab]

[/tabs]

It was surprisingly really good. M gobbled it up for dinner and said it’s the best thing I’ve cooked in a while. It was a hit and I’ll most likely make it again. It was easy to make.

BETA5 Chocolates‘ has launched their Valentine’s Pop-Up on Cambie and 17th in Vancouver.

Starting Thursday, February 2 the pop-up will be open 7 days/week from 12 pm – 7 pm until Tuesday, February 14. I came here for a sneak peek of their new temporary space and the unique chocolates and treats they are launching for Valentines Day.

What is so awesome about the pop-up is that they work with local artists in their mural, decor and furniture. Love how they always strive for local collaborations.

Strawberry and Jasmine Tea Cream Puff

This beautiful cream puff is topped with a macaron and gold flakes. A fancy cream puff made right. The flavours go well together and isn’t too sweet. I ate the macaron first and then devoured the rest.

Valentines Day Chocolate Collection

The Valentines Day collection has 6 different flavours in each box:

  • Sparkling Raspberry
  • Chai
  • Turkish Coffee
  • Sriracha-Sesame
  • Red Velvet
  • Hibiscus-Pistachio

There are 2 sizes for this collection – $15 for 6 pieces or $30 for 12 pieces.

Sparkling Raspberry

One of the most unique experiences because once you pop this into your mouth, you can hear the ‘pop rocks’ in action.

Turkish Coffee

This snowy white chocolate with a golden heart has a rich chocolate coffee taste. I love coffee, so this chocolate really made my day.

Hibiscus – Pistachio

The combination of hibiscus and pistachio is so interesting. I wouldn’t have thought they would go together, but it works.

Sriracha – Sesame

The Sriracha and sesame is a very interesting combination I tasted the sesame dominating the flavour then the subtle spice from the sriracha started to kick in.

Red Velvet

This pink chocolate has 3 tiny hearts on top. The red velvet surprise hides underneath the chocolate coating.

Chai

Chai balances out this Valentines Chocolate box with this great combination.

Heart of Gold

The Heart of Gold is shaped in a sphere and it has raspberry jelly, dark chocolate and tonka bean ganache, and crunchy almond-hazelnut praline.

Queen of Hearts

Their Queen of Hearts chocolate bar has freeze-dried raspberries and candied earl grey tea in 35% white chocolate. The raspberries give this bar a beautiful pink colour. It tastes great too.

Ice Cream Social

To celebrate the launch of the pop up shop, they help a one-night only ice cream social. You can get their raspberry and earl grey sundae, which has earl grey ice cream, raspberry sorbet, raspberry compote, vanilla chantilly and macarons.

They have these socials one in a while, so keep an eye out on their social media to find out when they happen.

Other items

They also have a few other items to purchase at the pop-up shop. Lots of chocolate to choose from.

Address:
3345 Cambie St, Vancouver

Website:
beta5chocolates.com

Gong Hey Fat Choy 恭禧发财.  Chinese New Year is upon us and it’s the Year of the Rooster. Many celebrations take place during this time including parades, dragon dances, reunions and elaborate dinners.

As food is a big part of Chinese New Year, buying all the necessary ingredients for dinner is essential especially if you are hosting a dinner in your home. Real Canadian Superstore and No Frills  carrying more ethnic foods, has a lot of sales going on right now and I love the lucky pricing. The number eight is considered to be a lucky number in Chinese culture because it sounds like a word meaning wealth or fortune.

Shopping

What I noticed in the past few years is they have upped their game in providing a lot of ethnic grocery options in the store. I’m able to purchase my favourite veggies like bok choy.

They also carry awesome fruits like dragon fruit and star fruit. Since the store is so large, being able to find most of the ingredients for your meal and getting anything else for your home like tooth paste or toilet paper is easy.

It’s a great time to come together with family and friends over Chinese New Year over delicious food.

Of course I like to be healthy, but I can’t say no to some delicious snacks or this huge box of Kellogg’s Corn Flakes with their limited edition Year of the Rooster box. I’m all about sharing, so I love to have snacks out on the table so friends and family can enjoy as they please.

I love spicy peanuts with szechuan peppercorn. It goes so well with beer and if you eat the chilli or peppercorn, it will give your mouth a numbing spicy sensation.

Peanuts are a symbol of longevity.

Candies are the best and I got some White Rabbit candy, Hi-Chew and soft Almond Nougat. I didn’t get the most traditional candy, but these are my favourite that I could find at Superstore. A Candy box aka “Box of Harmony” symbolizes money and sweetness of life. The container is also pretty cute.

I also love Bin Bin Rice Crackers don’t exactly have a symbolic meaning, but these crackers are awesome. I’ve eaten so many as a kid and they are so damn addictive.

Leen go or brown sugar rice cake is consumed during Chinese New Year. You can make it at home from scratch or purchase in store. This can be eaten as an afternoon snack to bring you luck and prosperity in the upcoming year.

Red Braised Pork Belly

A lot of food served for Chinese New Year is symbolic and pork symbolizes strength, wealth, and blessings. I cooked up a storm this week and I was amazed at how easy this recipe was.

[tabs tab1=”Red Braised Pork Belly Recipe” ]

[tab id=1]

Serves: 6
Prep time: 20 minutes
Cook time: 1 hour, 30 minutes

Ingredients:

  • 900 g skin-on pork belly
  • 2 tbsp (25 mL) Rooster Brand 100% Pure Canola Oil
  • 3 tbsp (45 mL) crushed Chinese rock sugar or granulated sugar
  • ¼ cup (50 mL) Chinese rice wine (Shao Hsing) or dry sherry
  • 3 cups (750 mL) chicken broth
  • 2 tbsp (25 mL) each Rooster Brand Superior Soy Sauce and Rooster Superior Dark Soy Sauce
  • 1 star anise
  • 1 cinnamon stick (2 inch/ 5 cm stick)
  • 3 green onions
  • 2-inch (5 cm) piece fresh ginger, peeled
  • Fresh cilantro, for garnish

Directions:

  1. Bring large saucepan of water to a boil. Add pork; return to a boil. Reduce heat to medium-high; cook 5 minutes. Transfer with tongs to cutting board; let cool enough to handle. Cut into 1-inch (2.5 cm) chunks. Set aside.
  2. Heat oil in wok or large (4 L) saucepan over low heat. Add sugar; cook, stirring, until melted and light brown, 8 to 10 minutes. Remove from heat; carefully add rice wine.
  3. Stir in pork, broth, soy sauce, dark soy sauce, star anise and cinnamon stick; bring to a boil over medium-high heat.
  4. Slice 2 green onions into 2-inch (5 cm) lengths. Add ginger to cutting board; hit sliced green onions and ginger several times with back of knife to lightly bruise and crush. Stir into pork mixture. Reduce heat to medium-low; cover and cook until pork is fork-tender, about 1 hour.
  5. Uncover; skim fat from surface of cooking liquid and discard. Increase heat to medium; cook uncovered, stirring often, until sauce is thick and syrupy, 15 to 20 minutes. Discard star anise and cinnamon stick. Transfer pork mixture to serving bowls. Thinly slice remaining green onion; sprinkle over top of pork mixture. Garnish with cilantro.

[/tab]

[/tabs]


These crispy rice cakes are drizzled with soy-ginger dipping sauce are topped with fiery sriracha mayo and perfectly seasoned Tuna Tataki. They’re delightful as appetizer bites served at cocktail parties and get-togethers. I was at a President’s Choice event and they showed us how to make this awesome appetizer.

It’s super simple and I wanted to share it with all of you.

[tabs tab1=”Recipe”]

[tab id=1]

Serves: 12

Ingredients:

  • 1 cup (250 mL) Sticky Rice, rinsed
  • 1-½ cups (375 mL) water
  • 1-½ tsp (7 mL) mirin (Japanese rice wine)
  • ½ tsp (2 mL) Seasoned Rice Vinegar
  • ½ tsp (2 mL) each granulated sugar and salt
  • ¼ cup (50 mL) vegetable oil
  • 1 pkg (112 g) PC Tuna Tataki, thawed
  • ¼ cup (50 mL) PC Sriracha Mayo Sandwich Spread
  • 2 tbsp (25 mL) sesame seeds
  • 1 green onion, thinly sliced on the bias

[/tab]

[/tabs]

Preheat oven to 325°F (160°C). Combine rinsed rice, water, mirin, vinegar and sugar in medium saucepan; bring to boil over medium heat.

Reduce heat to medium-low, cover and cook 18 minutes. Remove from heat; stir in salt. Spread rice out in large, wide-bottomed bowl; let cool completely.

Wet hands with water, keeping small bowl of water nearby for dipping fingers (easier to work with rice). Divide rice mixture in half and place each on a large square of plastic wrap; roll each into a log about 6 inches long, using plastic wrap as guide to help roll and form shape. Pinch ends tightly to ensure rice is compact. Refrigerate for an hour until firm.

Remove plastic wrap; using sharp knife (wet knife blade with water, if easier), cut each log into 6 even rounds.

With wet hands, press and shape into total of 12, 1/2-inch thick cakes. Sprinkle cut sides of cakes with sesame seeds, pressing gently to adhere.

Heat oil in medium skillet over medium-high heat; sear cakes, in batches and turning once, 3 or 4 minutes per side or until golden.

Transfer cakes to parchment paper-lined baking sheet. Bake until crispy, 8 to 10 minutes.

Let cool 10 minutes; drizzle cakes with accompanying Tataki sauce.

Cut larger slices of tuna as necessary to make 12 evenly-sized pieces. Top each cake with 1 tsp of the Sriracha Mayo and the tuna. Garnish with green onions.

That’s it, super simple and your guests will love these appetizers.

loblaws-from-our-chefs-thanksgiving-8

Putting together a dinner party isn’t easy and one thing that always stresses me out is the amount of planning that goes into each dish and making sure that everything is hot and ready by dinner time. Every Thanksgiving, everyone always anticipates the moist turkey that I make. This year we decided to have a few more friends join us for dinner, so a few extra side dishes needed to be prepared to make sure everyone’s bellies were full and as well as making sure there was plenty of leftovers. We paired it with Mission Hill Wine from the Okanagan, which is mighty delicious.

Preparation

loblaws-from-our-chefs-thanksgiving-1

A trip to the grocery store is essential to make sure you have everything for your meal. I went to Loblaws City Market as they just introduced their ‘From Our Chefs’ line of dishes as a good accompaniment to the turkey and roast beef for our dinner.

Loblaw Executive Chef Mark Russell ha spent the last few years perfecting their dishes to make sure they are store ready and the taste exceeds customers expectations. To save some time, I grabbed a few items to add to the dinner like salads, pasta, and mac + cheese. I don’t mind taking a shortcut because I only have so many ovens and stove tops for cooking.

loblaws-from-our-chefs-thanksgiving-1-2

Cooking

loblaws-from-our-chefs-thanksgiving-2

My favourite turkey to get is the President’s Choice Fresh Turkey as it’s already injected with butter. This turkey was 10kg/22 lbs and it took about 4.5 hours to cook at 350F. I layer the pan with cut up veggies and stuff the inside with more of the veggies.

Then, I rub the turkey with a butter and poultry herb mixture above the skin and under the skin. More butter the better right? Don’t forget to throw a pack of bacon on top too.

loblaws-from-our-chefs-thanksgiving-3

My sister made a delicious roast and it accompanied the dinner very well. The Angus certified beef is pretty amazing and make sure you get it spot on at medium rare.

Get a meat thermometer as that will be your best friend for getting perfect cooked roasts and turkeys.

Cheese and Meat Board

loblaws-from-our-chefs-thanksgiving-5

Before everyone gets here, the table needs to be set. So, in between checking on the turkey, setting the table is an important aspect that some people may forget about. While grocery shopping, I grabbed a few items from the Home Collection at Real Canadian Superstore to make sure the table was well presented. You don’t need to go overboard with centerpieces since food will take up most of the table.

I picked up some festive potpourri, a woven basket, cloth napkins, and placements to really tie the table together with hints of warm fall colours.

The table wouldn’t be complete without a cheese and meat board for the table. It’s a nice item to have when guests start arriving. I make sure to grab a soft cheese, hard cheese and then a few semi-soft cheeses. For meat, I got prosciutto and capicollo. My all time favourite crisps to get are the PC Black Label Cranberry + Fennel Artisan Crisps. So good. Throw some jam and fruit, then you’re set. Having some mini cheese knives are super handy and it fits perfectly on the board and not having long cutlery knives. Clearly, I’m such a fan of Presidents Choice products.

loblaws-from-our-chefs-thanksgiving-4

Main Feast

loblaws-from-our-chefs-thanksgiving-7

By dinner time, we had more food than we could fit on the table. There definitely was an abundance of food on the table. A half days of work and it’s really rewarding seeing all the happy faces at the table.

loblaws-from-our-chefs-thanksgiving-6

The sides from the Loblaws City Market ‘From Our Chefs’ dishes were such a huge help in adding a healthier part to the dinner. Heated up and ready to serve. Everyone’s favourite seemed to be the baked mac and cheese. Super cheesy and creamy.

loblaws-from-our-chefs-thanksgiving-1-3

Of course the star of the show was the turkey. Perfectly cooked and super moist on the inside. We did have the roast that we put in the oven but it needed a bit of extra time, so we accidentally missed it in our photos.

loblaws-from-our-chefs-thanksgiving-9

Once everything got plated, we dug in and didn’t stop eating until our pants needed to be unbuttoned. The guests who wore leggings and sweatpants were smart.

That’s my Thanksgiving dinner demystified. This dinner was partly sponsored by Loblaws City Market, but I stand behind their products. I make plenty of trips to The Real Canadian Superstore and I’m a proud customer.

pc-canning-1-1

With winter approaching, one of the best things to do with BC fruits is to pickle and preserve them to prolong their lifespan. Apples and pears work exceptionally well for chutney and jam. I love to make them an addition to my meat and cheese plates during holidays.

pc-canning-3

One of my favourite places to get my produce is Real Canadian Superstore as they carry about 40% local BC produce. A few weeks ago, Jackie Ellis and Real Canadian Superstore taught me the basics of canning and how to do it safely. Apparently, a majority of people will have fears of canning because they are afraid of accidentally doing in incorrectly.

Here are three recipes to begin canning.

pc-canning-6

Spicy Pear Pickles

pc-canning-5

[tabs tab1=”Spicy Pear Pickles” ]

[tab id=1]

Makes about 10 x 220mL jars

Ingredients:

  • 14 local BC pears, peeled, cored and sliced into 1/8” inch slices
  • 0.5 cup lemon juice
  • 1-2 tbsp gochu garu (Korean red pepper flake) depending on how spicy you like it
  • 2 cup daikon, small diced
  • 2 tbsp sesame oil
  • 2 tbsp minced ginger + 10 slices
  • 3 green onion cut into 3” strips
  • 10 cloves garlic
  • 2 tbsp peppercorn
  • 10 strips lemon peel
  • 5 cups rice vinegar
  • 1 cup mirin
  • ½ cup fish sauce
  • 0.3 cup salt
  • 1.5 cup sugar

Directions:

  1. Gently mix pears, gochu garu, lemon juice, daikon, sesame oil and minced ginger in a large bowl.
  2. Place a few strips of green onion in sterilized jars and fill snugly with the pear mixture until they are about 1 to 1 ½” from the rim.
  3. Boil the slices of ginger, garlic cloves peppercorns, lemon peel, vinegar, mirin, fish sauce, salt and sugar in a large pot until the sugar and salt are fully dissolved and the mixture is at a rolling boil.
  4. Pour the vinegar mixture evenly into the jars so they cover the pears, making sure that one slice of ginger, one clove of garlic and one lemon peel are in each jar.
  5. Cover the jars and refrigerate, allow ferment and eat within 2 weeks. The flavour will intensify as time passes so you can eat the pears immediately or after a week and a half to get more intensity.
  6. Eat with Asian dishes like soba noodles, on top of fried eggs and rice, in beef and lettuce wraps or in rice bowls.

[/tab]

[/tabs]

Cranberry Pear Chutney

pc-canning-9

[tabs tab1=”Cranberry Pear Chutney” ]

[tab id=1]

Makes about 10 x 220mL jars.

Ingredients:

  • 2 tbsp cup olive oil
  • 225g shallots
  • 10g thyme sprigs, tied with twine
  • 1 tsp pepper
  • 2 tsp salt
  • 250mL balsamic vinegar
  • 3 cups brown sugar
  • 1.3kg fresh cranberries
  • 5 pears cut into ½” cubes

Directions:

  1. Add oil, shallots, thyme, salt and pepper in a large, heavy bottom pot on medium heat.
  2. Sautee until the shallots are softened slightly.
  3. Add the vinegar, sugar and cranberries and bring to a boil.
  4. Cook until about ½ of the cranberries are popped and become sauce-like.
  5. Add the pears and bring to a boil.
  6. Place the mixture into sterilized jars and can the jars to hold in a pantry.
  7. Freeze as a freezer jam for up to 3 months or refrigerate and eat within 2 weeks.


[/tab]

[/tabs]

Spiced Apple Butter

pc-canning-10

[tabs tab1=”Spiced Apple Butter”]

[tab id=1]

Makes about 10 x 220mL jars

Ingredients:

  • 12-13 local BC apples, peeled, cored and cut into 1” chunks. (Use sauce apples)
  • 1 cup water
  • Juice of 2 lemons
  • Peels of 2 lemons, cut in strips and wrapped in cheesecloth
  • 375g golden brown sugar
  • 1 tsp salt
  • 2 tsp cardamom
  • 0.25 tsp allspice
  • 0.25 tsp cloves
  • 0.5 tsp nutmeg
  • 1 tsp cinnamon
  • 3 vanilla beans

Directions:

  1. Preheat oven to 300F.
  2. Place all ingredients into a large, oven-safe pot and bring to boil.
  3. Turn the heat down to medium-low and simmer, uncovered, until the apples break down into a sauce.
  4. Turn off the heat and place the entire pot, uncovered into the oven to cook down for about 4-5 hours, or until the applesauce is thick and dark.
  5. Remove from the oven and blend using an immersion blender until very smooth.
  6. Place the mixture into sterilized jars and can the jars to hold in a pantry.
  7. Freeze as a freezer jam for up to 3 months or refrigerate and eat within 2 weeks.

[/tab]

[/tabs]